Pages

Friday, August 31, 2012

The Devil is in the Details...

We're getting ready to paint the living room!!! So excited! We've got the paint and now it's time to prep - which honestly is the least exciting part of painting. I mean, when the color goes on the wall and suddenly the whole room changes - THAT'S when it's exciting. But before you get that awesome feeling you have to trudge through... the details. They vary on each job but every project has them. Today, my details were patching nail holes and touching up the trim.

Lotsa nail holes (TC, why did you hang so many things?!)...

The trim is white so I'm not planning on painting it. BUT the tops of the baseboard and the sides of the all window trim was painted. Strange. And I really feel like all of the trim should be the same color. So I got a artist paintbrush (about 1/2 inch in diameter) and touched up allllllllll the trim. Took quite a while but I think the finished look will be worth it. (Oh, and the white I used to touch up was "whiter" than the trim white. So don't look too closely...)

Before...

During.... (I promise the difference in whites isn't THAT obvious! The flash and wet paint just makes it even more different. Yikes!)


Oh, we had a built-in bookcase that was blue...

And now it's white! YAY!


Check back soon for living room color!!!

Monday, August 27, 2012

The bedroom update!!!

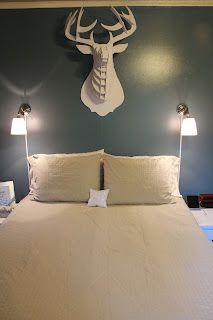
I am LOVING this update. This might actually be my very favorite update we've done to the house so far. And it's great because we get to take it all with us when we move (which probably won't be for a year or two). And it's all brought to you by the amazing Tim Carson who battled tripped breakers, completely took down a light when I decided it needed to be a foot higher, and replaced a faulty pullchain which required dissecting one of the lights. He's pretty awesome. ;-D

Anyways! Enough about my amazing husband. The reveal!!!

Wait for it....


 Tim and I took quite a few pictures so I'm posting a lot of them so you can see with different lighting and from different angles!


Like the deer head? I gave it to Tim on Valentine's Day and it was made by my very talented friend Joanna Jinright. Seriously. She's amazing.


 These are the lights we got for $14.99 at Ikea and they are perfect! And Tim had the great idea to hide the cord so he picked up this at Lowe's. He cut it in half to use on each side and then used a level to make sure it was straight. It's got sticky stuff on the back so he just peeled off the tabs and pressed it onto the wall. If we had any extra paint, I would have painted it to blend in but that's okay! It still looks super neat and tidy! I love it!

 The duvet cover we also got at Ikea for $49.99. We got a king-size cover even though we only have a queen size bed because I love how it comes down longer on the sides! And it's better in case you have one person that steals the covers (*cough* Tim *cough*). OH! And the cute little white pillow? Mom made that for our ring bearer to use walking down the aisle. After the wedding she replaced the stuffing with dried lavender so it's now a sweet sachet!

And how great do our bedside tables look?! I am loving their classic look. This is my side. The pretty tin box was a wedding gift and the frame was a gift from me to Tim while we were engaged. It was a Pinterest idea that I liked (though I'm not really the hugest fan of Pinterest). I printed out the words "I Love you because..." on a pretty piece of paper and framed it. Then using a wet-erase marker, you can write on the glass. Tim and I write sweet or goofy things to each other and put the frame in random places around the house. Okay, I'm done being sappy. You can stop groaning now. ;-)


Don't you just LOVE our bedroom now? And this is only half of it. The other part of the room is still in progress...
Still to do on this bed:
  • Make a bed skirt (got a twin sheet so I'm going to see if I can make that into a bedskirt)
  • Fix the tan pillows. Since we got a kingsize duvet, the pillows were king size (aka extra long). So I've got a plan to use that extra length and make them even cuter. We'll see...

Sunday, August 26, 2012

The Kitchen...

Oh this kitchen. So we aren't allowed to paint or take down the lovely wallpaper border (well, I'm sure the owners thought it was lovely...) so the changes we can make in the kitchen are very minimal. Still, I wanted to make it as ours as we could. Here's what it looked like the day we got back from Maine:


And here's a close-up of the wallpaper border. What is that thing? A monkey with too many appendages? A mutant lizard?  

  ANYWAYS! I cleared out all the junk, put out all our china, took off the shutters from the window, and cleaned a ton. The countertops were super nasty - just plain wood and you could feel stickiness from years of soaking up food.


Ew. So Tim was super amazing and sanded them and then put 5 coats of clear polyurethane. Now I'm not afraid to put food down on them. YAY!


So the "finished" kitchen is...


 Our lovely china, along with lots of wedding presents. And I love the flour and sugar being right at my finger tips and beside the super cute Carson platter from a new brother and sister-in-law (thanks Chris, Susan and Emma!!!).


The china I used to have came with me too because it's white and we could use it if we have a big crowd over for dinner. And it looks pretty. ;-)

Our cups look great in the other open cabinet and our new microwave and Keurig work great. Tim takes a coffee to work every morning in a Tervis Tumbler. ;-)


Above the refrigerator we have the china that Tim got on sale. He loves a deal. And the cups and bowls are a really great size.


A look at this whole side of the room. Above the stove we have a cute sign from Hobby Lobby (half-off, of course), and cute black canisters with C's on them from the wife of the minister who married us (thanks Donnie and Jane!). Actually, every single thing in this picture is a wedding gift. We are so blessed!!!


 In a kitchen you must have a clock and a calendar. And of course our calendar must be Chick-fil-A. ;-)


Under the cabinet was super dark because when you stood at the countertop, you blocked the only light source. I looked at lights at Lowe's and they were around $30 for an under-cabinet light. Thankfully, I decided to check Walmart first because this light was only $8. Yes, please! Two quick screws and I was in business!

A close-up of the sign over the stove. Don't you love it? =D

That's all I've got for now! A bedroom update is coming soon! As I type, Tim is putting up the new wall bedside lamps! Hooray!!! OH! And soon this living room will be a new color because this sky blue has gotta go! Here's my current opinion about the walls:

Saturday, August 25, 2012

Little changes...

No huge progress steps today but I did make little changes which I am LOVING! First, the bathroom has exactly ZERO rods for hanging towels. We have "over-the-door" hooks to hang ones we're currently using but I wanted somewhere to put new, clean towels. Thanks to Ikea we spent $14.99 and got this shelf. We added some nice white towels we got as wedding presents (thank you to everyone who bought us new towels!!!) and TADA!

Oh, then our bedside tables! Yesterday I spray painted Tim's nightstand that looked like this:
It was way too modern for my taste so I wanted to change it. Handles are a great way to change the look of a piece without spending much money! We found handles we liked at Hobby Lobby (always 50% off!). Then I put them on like Dad taught me how. First, measure the front of the drawer and find the exact middle and mark it with a pencil. Then measure the distance between the holes in the handles (3.75" for us), divide it in half (1 7/8") and mark that distance away from the center. 


Then drill pilot holes with a drill bit slightly smaller than your screws.
Then screw your handles on. We only had silver screws...
But a touch of black paint covered them up perfectly!
 The finished product?
YAY! They look so good now! (And isn't that the cutest little tin box? Another sweet wedding present.) As soon as we get our new bedding on (which requires finding a super cheap duvet to stick inside the duvet cover) and Tim puts up the new bedside lighting, I'll show you a picture of the updated room! Hooray for little changes!

Friday, August 24, 2012

Progress?

Tim worked a million hours yesterday (Thursday). And by a million, I mean 12. So while he was busy at work, I decided to be busy here. This is what our "Sewing Room/Office" looked like Tuesday morning:
Yup. Pretty bad. It held all our stuff we were collecting for a yard sale, all my stuff from my last trip to Dalton (winter clothing, shoes, sewing stuff, etc), all our tools and all our cleaning supplies. Kinda a catch-all room. Enough of that!

Oh, and we have a Great Room that spans the length of the house that we are closing off because it has exactly zero insulation and is ridiculous to try to cool! So all the yard sale stuff will go in there. Along with anything else I don't wanna deal with right now. ;-)
Thursday night this is what the Sewing Room looked like:
Empty at least... but NASTY! Tim is going to rip up the rest of the carpet soon. Thank heavens!

 Next project: Our Bedroom. As soon as we got back form Maine, we moved the bed into the first part of the room underneath the epic deer head made my the very talented Joanna. The problem was our bed side tables. I had two black ones (on the left in the picture) but they were WAY too wide. Tim had one (a Malm from Ikea) that worked well and was the right size but wasn't very visually appealing (sorry honeybun!). He suggested getting me a white one, painting his and then he conceded to putting cute handles on them.

 Yesterday I put together my Malm (only $39 at Ikea) and added two black handles from Hobby Lobby ($1.50 each). It looks so fabulous! Pictures soon!
We also got a new duvet cover at Ikea and bedside lamps so check back soon for more updates!

Off to clean up the junk that has moved to the hallway...

Thursday, August 16, 2012

Modern Antiquing...18th century style!!!

I don't have much for now....BUT DeLancey and I just got back from Lowe's and made such an epic purchase! They had 15 inch Queen Anne furniture legs on clearance!!

They were originally almost $10 per leg...we got them for $1.20 per leg! Best $5.14 we've spent thus far!

My next project (in all the spare time that I have) will be a bench for the dining room; it'll definitely be a step up from the last bench I made out of scrap wood from an old roommate's bunk bed! MY budget for wood and bracing equipment/screws on this project will be $20...we'll see if that's even possible. Here's my inspiration (DeLancey will obviously not use the same ugly fabric to upholster it):

That's all I've got! LATER!!
-Tim

Dining Room Update!

New "In Progress" pictures of our dining room! It's not finished yet because there are no decorations on the wall and the only furniture pieces are the table and chairs. Let's just stay it's streamlined. ;-)

A reminder of the "Before":

Tim helped paint: (he almost blend in!)

Tim had a pair of Ikea curtains laying in a drawer unopened. We had to buy one additional rod, and then he and TC hung the rods. I shortened the curtains and TADA! Love it!


Total cost = $75 for 2 gallons of Rave Red paint and $18 for a curtain rod


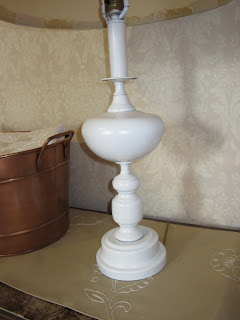
Oh, and wanted a lamp to go in the foyer but lamps are so expensive! Enter THIS lamp that was in our garage sale pile because, let's face it, it's an ugly lamp. Old and dingy and dirty.

So I taped off the cord and the light bulb sockets...

And then coated it with good ole white gloss spray paint...


While that was drying, I recovered the shade with some silk remnant fabric I got on clearance at Hobby Lobby. I just hot glued it to the inside of the bottom, then hot glued it to the inside of the top (just the darker cream stripes), then pleated the lighter cream stripes and hot glued them. Just lots of pinching and hot gluing.


 Aaaaaaand:


 So much better, right??? Oh, and I added some picture frames I already owned to the mantle. Eventually those scones will be spray painted but I can't decide on a color! ;-)


That's all for today! Off to make Breakfast Supper! Mmmm!!!